RSS

Category Archives: Game Dev

New Intelligence: Project Methodology

Critical Chain / Agile hybrid

Also known as Critical Path. We combined the critical chain methodology with the agile methodology.

What is Agile?

Agile management, or agile process management, or simply agile refers to an iterative, incremental method of managing the design and build activities of engineering, information technology and other business areas that aim to provide new product or service development in a highly flexible and interactive manner; an example is its application in Scrum, an original form of agile software development.[1] It requires capable individuals from the relevant business, openness to consistent customer input, and management openness to non-hierarchical forms of leadership. [1] The Agile Manifesto, is centered on four values:

  1. Communication with parties is more important than standard procedures and tools.
  2. Focus on delivering a working application and less focus on providing thorough documentation.
  3. Collaborate more with clients.
  4. Be open to changes instead of freezing the scope of the work.[2]

Modified

What is Critical Chain?

As opposed to waterfall and agile project management, that focus more on schedules and tasks, the critical chain project management methodology is geared more towards solving resource problems. Each project has a certain set of core elements, called a critical chain (sometimes referred as critical path), that establish a project’s minimum timeline. The critical chain methodology devotes adequate resources to this critical chain while devoting enough resources to other tasks such that they can run concurrently, but still have enough of a buffer to reassign resources when needed. This setup is ideal for resource-heavy teams, or for those who have enough flexibility in their team members’ respective skill sets.

Going in to create a serious game for NI, we had the mindset of using an agile project methodology. Purely because this is the first time that the team and I had “worked” for someone else. Although NI were our ‘client’ and seeking our expertise, they are the ones who know the content inside and out and what the apps intention is. Ultimately we are following their lead, and they ours. Leaning on each others expertise. It was never going to be a straight forward project for so many reasons that i’ll get to talking about in the post-mortem. We knew there was a start and end date, but the in between was bound to change. We were never going to know the exact timeline so it needed to be flexible. We’d also have to account change for collaboration or meetings between New Intelligence and the team. We ended up adapting and morphing an agile methodology with the critical chain methodology. We needed critical chain because we did have core elements that needed attention, but the the timing of which changes. Also because Agile puts more of a focus on delivering a working application than documentation, but this project still relied VERY heavily on documentation.

  • A – So we knew what we were doing.
  • B – So we didn’t forget what we were doing.
  • C – We needed to figure out the systems and what exactly is going into this app.
  • D – We needed others to understand what we were doing.
  • E – What if we were going to continue working on this after the delivery? What if someone else is?

The critical chain methodology helps us identify the most urgent task and work towards is. It also helps us identify deadlines that we need to work towards and set focus on that. We know that there are milestones and that those milestones might change. The milestones content might change, or the time of achieving this milestone might be pushed forward or back. Critical chain also helps us adequately assign our valuable resources to work towards specific outcomes whilst still assigning resources to other tasks that can progress side by side without depending on each other to progress forward.

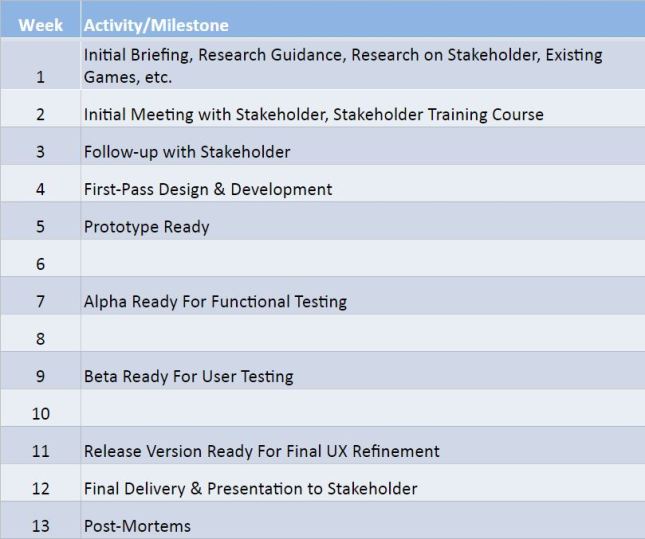
The projected timeline

Initial Project Timeline


To wrap up my points above, this has been the first project where I’ve actively stepped down from the project management role. However, I’ve happily shared all the tips and tricks that I’ve learnt along the way, to help better enrich the knowledge of our project manager in this instance. Ultimately it’s his say on how the project will be run, and what our approach to tasks and deadlines will be. My personal mentality is that, he says we’re doing it this way, and I say “okay”.

Until next time –

Nic


Bibliography

Text

5 Effective Project Management Methodologies and When to Use Them. (2017). Explore.easyprojects.net. Retrieved from https://explore.easyprojects.net/blog/project-management-methodologies

Agile management. (2017). En.wikipedia.org. Retrieved from https://en.wikipedia.org/wiki/Agile_management

 
2 Comments

Posted by on March 31, 2017 in Game Dev


2D Sprite Sheet – Slicing

Studio 2’s second game is what will be a 2D walking simulator (with a jump button) that flows through 4 emotions. We have an animation collaborator Macauley. He’s making our character sprite and animating it through sprite sheets.

I’m really new to 2D. Art based 2D anyway. I’ve always just used assets I found on internet and unity’s asset store. Because we have an artist with us who is making our character and using sprite sheets. I needed to learn how to make it animate. Do its stuff.

Ash Jagath was close enough and had experience with this before. He showed me the ropes and basics of 2D sprite sheet splicing. I could go into detail about how – but unity pretty much has it covered. We are also using a 2D character controller I found online. It already has an Animation controller set up with it – So all I needed to do was – when I sliced the animations correctly parse them into the controller.

animation-controller

Animation Controller

idle

Idle

For some of the other animations – such as the jump, there were to many frames leading up to when the jump actually happened as opposed to when the character actually left the ground. This was partly our fault for not telling the animator that for the game, the jump would be instantaneous. But I edited which frames were being used for the jump to make it more instantaneous.

jump

Jump Shortened.JPG

Until next time –

Nic


Leave a comment

Posted by on October 19, 2016 in 2D, Animation, Game Dev


The Ride – Post Mortem

‘The Ride’

Download link: Itch.io.

the-ride

What:

The entire intent of ‘The Ride’ was to try to convey some of the beauties of how it feels to ride a road bike. Overall for just over a two-week creation process I think it’s a pretty darn solid effort.

How:

I intended on constructing this game as if someone else was in my shoes – Someone that might have never had the experiences I’ve had, or the emotions I’ve felt on various occasions. This wasn’t just put someone on a bike and make it move forward and lean. That part needed to be mechanically sound but still needed the polish to make it feel real.

Majority of the game was about actually riding so this needed to feel right. Right enough for player’s to feel the flow – without the real world repercussions to having a heavy machine beneath you. Having the camera positioned in the right place above the seat, the speed of which the bike lean transitioned from side to side.

A very big part of trying to immerse player’s and really give them a sense of being there was to literally make them ‘Kit Up’ and put them in a simulated situation. I reached out to collaborators early to try to get them on board. Their skill sets would be vital to feel the part.

I (roughly) modeled the bike based on my own FZ6R in about half a day’s worth of effort.

Bike progress 2.PNG


Bike Gear – Peter Buck: Blog Link.

Bike Gear.PNG


Audio: With the exception of one song (Eleven8 – The Colour Of Distance).

All audio inside of ‘The Ride’ was recorded/generated/edited by:

The sounds of the bike gear in the garage and the bike audio itsself was recorded from my actual bike & bike gear.

As the players continue to pick up pieces of gear the playable characters movement speed increases. It’s to signify that as you get closer to riding, you feel enlightened and empowered, ready to be free. A small decision that makes a big impact is putting the helmet over the camera when the player has put it on. Makes the visibility quite the same as (but not as dramatic as) having a helmet on. Along with the sound of the footsteps going from: Having a dull no-shoe wearing thud. To when the boots are put on and changing the sound to the actual sounds of my boots hitting the ground.

helmet-floorhelmet-on

Switching from placeholder primitive shapes to properly sculpted bike gear makes it apparent that you are literally kitting up with bike gear ready to ride. The sound effects that Ash, Chris and Johan made really hone in on that extra polish feel to put the player in the The Ride.


Once on the bike and when the bike audio has played – you are ready to ride out of the garage. I wanted this to be the moment that the player’s saw the garage door opening notice the beauty that lies beyond. From here the game has been in greyscale – It’s definitely not to convey sadness or any dark meaning but only to make the flow of colour feel more enriching. The moment that colour starts to decend and the bloom kicks in is to reveal the beauty of what it’s like to ride on a day like the one outside of the garage.

The Ride - Colour Fade In.gif

Have you ever driven on a road that has trees running parallel to it? Perfectly spaced trees which it makes your inner OCD cry with joy? Which makes it feel like for the duration of that stretch – as long as those trees are zooming past, nothing else matters? Absolute serenity.

Straight Road With Trees.jpg

This is what I wanted the initial road to be and what it became. Beyond the trees just needed feel like an open field of nature. Away from the busy construct that is the modern-day.

Straight Road.PNG


Eventually venturing into more abstract concepts to take them away from the reality that is earth. Make their mind and body feel as if this wasn’t its usual place. Into a tunnel that starts from being realistic and gradually changing into a weird tunnel that feels like you’re entering a wormhole – before being spat out into a never before seen nebula.

From there it was a matter of giving the player more space to flow from side to side. Make it a little bit more abstract by adding a few bikes riding either side that follow the exact same movements. Let them soak in the atmosphere, before bringing them back to the realization that although you are on a road and you feel as light as a feather and flow like a river – You are not alone. There are dangers – you to them, and them to you.

Until next time –

FeenikxFire

Nic


SPOILERS

 
Leave a comment

Posted by on October 5, 2016 in Game Dev


The Ride – Let’s Get Some Audio

The Ride is a personal experience game about how it feels to ride. And being a personal experience game – what better audio than the sounds that my own motorbike actually makes?

This slideshow requires JavaScript.

Tonight I met up with the three audio students that agreed to work on the ride with me.

AshChrisJohan

We discussed a few ideas of what positions the mic’s could be in to record the best audio with the least amount of wind, loaded me up with different mics and set me off to ride. The best mic ended up being the last one we tried which was taped to the inside of my jacket – completely protected from wind.

I never thought I’d be riding a motorbike while strapped up with mics – especially to record audio for a game I’m making. This blog is just – here’s a thing we did. It was something out of the ordinary, and it was a really worthwhile. The experience alone and getting to work some people who are in a different discipline, but share the same enthusiasm and passion for what we do. Unfortunately the project was so short for me, the audio guys said this would be a project they would love to have a few months on.

Edit: Chris did a vlog on some of the audio stuff we did for the ride.

Game dev makes me feel like spongebob:

Spongebob Dance.gif

Until next time –

FeenikxFire

Nic

 
Leave a comment

Posted by on September 27, 2016 in Audio, Game Dev, Games, Uncategorized


The Start Of A New Chapter: Studio 2

Studio 1 was all about learning new skills and learning from making mistakes. Along with mechanically focused game design. Studio 2 is about thinking of other aspects of video games like: FeelVisualsAudioStoryEmotions, etc, and how they interact with mechanics to say interesting and meaningful things. The things we create in studio 2 aren’t going to be mechanically focused, but more emotionally focused, more about meaningful design. Trying to give the player an exact experience or feeling, other than “Whacking s**t is cool”.

Whack.gif

Meaningful Design

My understanding of meaningful design is that everything we design must have intent. If it’s in the game, it has to mean something, or add something to already existing content in the game, otherwise, why is it there?

black-square

Much like this black square. It serves no purpose and doesn’t add anything extra to this blog. Unless somehow you can draw more meaning from it than I can.

Rami Ismail wrote a very striking blog on a different approach to traditionally taught MDA (which we’ve been taught since day 1) to IMD – Intent, Mechanics, Declaration. The first sentence of his blog goes a little like this:

Rami Ismail The Center of Everything Blog sentence 1.JPG

Retrieved from: Rami’s Blog

All previous games that I’ve made or collaborated on really only had the intent of mechanics and game play for “Yeah this is a game and I can do stuff”. Considering Studio 2 is about how to say something with a deeper meaning this is exactly something that I want to learn. Meaningful game play isn’t just about how systems interact but the decisions that players have to make which creates a dynamic game play loop. Right now I’m familiar with how to create mechanics but not so much on the meaningful game play. I’m hoping throughout studio 2 will allow me to focus solely on creating an experience or emotion, along with being able to experiment with tools and gain new skills that allow me to do so competently. Through learning how to create emotional and expressive design it will enable me to create more thematically consistent experiences.

Until next time –

FeenikxFire


Leave a comment

Posted by on September 22, 2016 in Game Dev


Transmutation: Camera Effects

Unity has some image effect standard assets that allow some pretty cool things to be able to happen to the camera.

Image Effects

Importing Image Effects

I started to fiddle with and check out all of the image effects on the camera, what they did, and which ones I thought would be appropriate to use.

I had Noise Grain: But chose not to continue trying to make it work.

Noise Grain.JPG

It didn’t add anything to the game play or make it feel more interesting. It was cool but didn’t change the atmosphere or experience that I was going for. Noise Grain is out.


I came across motion blur. It felt like if a person was to get radiation this is probably what they’re going to see.


0.92 Motion Blur.gif

Maximum Motion Blur

This was great, but I’d have to find a way to make sure that the player’s current radiation level on each character was affecting the amount of motion blur that the camera put out.

Motion Blur Script.JPG

Access the Proper Motion Blur Script

Because of the camera switching players and there only being 1 camera, it was easy to find the parent object constantly and get that parent object (player)’s radiation level. Then make the motion blur amount to 100th of the radiation level. Because the radiation level goes from a scale to 0-100, and the motion blur from 0-0.92. The divide amount is a set variable so there’s no magic numbers. But the / halfDivideAmount – I’ll get to that in a bit.

So the motion blur would increase with the players radiation and become more intense with the more radiation the current player had. Until it reached its maximum of 0.92. It looked pretty crazy but I knew I wasn’t going to leave it at that.


Next was bloom (makes colours brighter and more vibrant). Transmutation relies on the emphasis of lighting. Bloom just makes it more beautiful.

This slideshow requires JavaScript.

I fiddled with the Bloom Intensity for a while to try and find the right value. Bloom 3 was a really nice amount. 15 Was really cool, but obviously too much. So I decided to roll with three and give it a proper play test.

This slideshow requires JavaScript.

If a few mutants or radioactive goop puddles ended up close enough to each other it proved to still be a bit too ridiculous. I’d also recently discovered ToneMapping. This is a hard one to explain. “Monitors (along with others) all have a limited dynamic range (LDR) that is inadequate to reproduce the full range of light intensities present in natural scenes. Tone mapping addresses the problem of strong contrast reduction from the scene radiance to the displayable range while preserving the image details and color appearance important to appreciate the original scene content.” (WikiPedia). It evens out the amount of colour per pixel that’s close enough to each other to fit withing a 255 RGB (W & B) range? Or something? Anywho, It works!

This slideshow requires JavaScript.

I was still able to have the 3 intensity of Bloom and have the ToneMapping work its magic to make sure radioactive goop puddles didn’t become a pile of suns.

I thought about making the bloom scale with the players radiation level much like the motion blur. But after play testing with the tonemapping activated and the bloom set at 3, I was content. Although at the start while the level is much more empty and less bloomy, letting the game take it’s course and spawn mutants and radioactive goop puddles never became overwhelming but only more beautiful as time went on.


It came to a point where I found more image effects that seemed like they would be applicable if someone was suffering from radiation. Vortex!

Vortex.gif

Vortex allowed me to make vortex in the middle of the screen. I thought that along with the player getting motion blurring with radiation, why not have the vortex change between two values to give the effect of wobbling. I started with an angle of 25 to -25 (A range of 50).

This slideshow requires JavaScript.

Then I had to design the system to make it change between these two values. I wanted the angle to have a maximum and minimum value but change how fast it wobbles between the two based on the players current radiation level.

Vortex Script.JPG


Much like the motion blur, I needed to make the script I’m making access the ImageEffects.Vortex to get the angle of the vortex.

  • Start the current vortex angle on 0.01f (It’s not noticeable).
  • Have a countingUp bool = true (To make sure the vortex starts adding).
  • Make the camera get the parent player (because this changes)
  • Determine how fast the angle is going to change based on the current players radiation level.
  • Start the angle changing. If the current vortex angle is not maximum – Start making it ++ towards the maximum value by deltatime * vortexRate.
  • If the angle is at the desired maximum, start making it — down towards the negative value.
  • Set the vortex angle to the currentVortex.

When this came into play along with Bloom and Motion Blur – having maximum angles of 25 and -25 was a bit too much. It was completely mind boggling, It was really hard to comprehend what was happening and what you were supposed to be looking at or doing.

I changed the maximum and minimum values to be 10 and -10 (range of 20). The range of 20 made it still easily recognizable to understand whats going on and what you’re actually doing. Changing between the max and minimum at a rate of (makeFloat 5) was an ideal speed.
For Example: If the current player’s radiation was 50.
The vortex rate would be: (50 / 5) = 10.
Then the angle is changing by + or – by (Time.deltaTime (which is anywhere between 0.03 to 0.075 on my computer) * 10) which is anywhere from 0.3 or 0.75 per frame.
In a span of 5 frames at a rate of 0.75 the angle would change 3.75. And if there is a range of 20 it would be changing from max to min in 5.333(more) seconds.
At 90 radiation: The vortex rate would be 90 / 5 =18.
0.075 * 18. In 5 frames it would change 6.75. It would change from max to min range in 2.96296(more). That amount doesn’t make ME sick. And I hope it doesn’t make others sick. So as the radiation increases so does the speed of rate the angle of the vortex. If the rate needs to be smaller or higher all I have to do is adjust the makeFloat value.

At this point I also changed the maximum amount of motion blur. And as I mentioned earlier. The HalfDivideAmount. Read the big block of Green text.

Motion Blur Script

50% of motion blur at almost maximum radiation along with Bloom and Vortex was the perfect amount.


The one last image effect that I thought would add to the radiation would be something that resembles the player blacking out. Like A Vignette?

Vignette.jpg

There was also an image effect for that too. And much like the motion blur.

Vignette Script.JPG

I’d need to access the Vignette script directly and apply the exact same principles. Because the vignette intensity goes from 0-1 (then anything over 1 makes the game white) and 1 intensity would make the entire screen black – the player wouldn’t be able to see what they’re doing from about 80 radiation and on wards. So 50% (0.5) intensity on TOP of all the other image effects would be more than enough to represent the player blacking out / dying.

Vignette Game.JPG

Are you ready? READY FOR THE MAGIC?

Until next time –

FeenikxFire

Nic

 
Leave a comment

Posted by on August 25, 2016 in C#, Game Dev, Post FX


Tags: , , , , ,

Transmutation: Mutant Particle Systems

Transmutation felt bare bones without anything other than audio feedback. So I decided to fiddle with the particle systems built into unity.

Particle Systems

Particle System

What I wanted, was to create a little explosion of little radioactive goop particles when the players hit the mutants. So firstly I ended up making a random little radioactive goop blob in 3ds Max.

Then imported it into unity, and made my particle system contain the new goop blob. The Render mode needs to be mesh, not billboard. I made my goop blob have the colour and size I wanted before making it a prefab and then making the particle system use the prefab as the object to spawn. From there it was a matter of exploring all of the options of particle systems to try to make it look like a little explosion of blobs.

Big Goop Burst.gif

They all start with a random rotation and randomly rotate through the air. They scale smaller and smaller as time goes on to make it look like they’re shrinking as they fall further. It also only happens in a small burst. It was close, but it was missing something. I came up with the idea to create a second particle system with a different shape to give it the extra feel of goop flying out, rather than having the same object every time.

Tiny Radioactive Goop Particle

Little Glop


A sphere that resembles a blob. Because it was going to be small in size, it wouldn’t need a distinct shape. But it needed some modifying from a perfectly round sphere to make it actually look like a little blob of liquid.

Tiny Blob Particle System.gif

Each Particle Effect

The only thing left to do was make it happen when the player hits the mutant. The mutant needed to have reference to the particle systems and the players weapon was already dealing the damage, so this is where it would tell the mutant to play the particle system burst.

Particle Systems

Particle Systems In Mutant

Play The Particle System

In Player’s Weapon

I knew the mutants were going to destroy themselves if their health got to zero, which would mean that if a particle system is playing while the mutant dies, the particle system would instantly disappear. That’s not what I wanted, so when the mutant is about to die, make the particle systems their own object to finish playing.

Particle System Make Parent Null

Make Parent Null

Tadaa! The desired effect has been achieved!

Combined Particle Effect.gif

Until next time –

FeenikxFire

Nic

 
Leave a comment

Posted by on August 24, 2016 in 3ds Max, Game Dev


Tags: , , , , , ,

Transmutation Lighting Effects

Because Transmutation is in a canteen 5 levels underground and is currently going through a nuclear meltdown the level environment needs to be lit in a different manner. 5 Levels underground – there are no windows to look outside, there is no direct sunlight (also because it’s night time) and there are radioactive mutants running around. All of these elements combined is reason enough to want to focus on the lighting.

So – my particular goal was to create a level environment that is well lit in it’s original form, but when things go wrong – have emphasis on and have the player rely on the siren lights and the radioactive mutants for guidance. The reason why I wanted the lighting to be like this is because in a completely confined space with no natural source of light or constant activated light there needed to be a way to have lighting without giving the players a torch. Also because there was an opportunity to utilize having radioactive mutants in a confined space. The intent was to create a dark atmosphere that still gave the players ability to traverse the environment but to also have opportunities to create more well lit areas. It also fit in with the “Horde Mode” feel of the game – having more and more enemies would generate more and more light. Of course there is a point where there is too much and that’s something that still needs working on.

This slideshow requires JavaScript.

But, there’s a significant difference between dimming the lights by a fair bit – and turning them off completely. Having them turned off completely makes the only way to see anything other than the elevator light and the siren lights is through the light that Mutants produce. This wasn’t the desired effect because I still wanted players to be able to visibly see and traverse the level environment that I had created for them. So instead of disabling the lights – dimming them by a great deal still enabled the room to have enough light to see the outline of where objects were placed, making it still possible to traverse the level.

This slideshow requires JavaScript.

At all times the level has enough constant light to enable players to traverse the area they need to.

Until next time –

FeenikxFire

Nic

 
Leave a comment

Posted by on August 19, 2016 in Game Dev, Post FX


Tags: , , ,

3ds Max – 3D Radioactive Goop

 
Leave a comment

Posted by on August 19, 2016 in 3ds Max, Game Dev


Tags: , , ,

3ds Max – 3D Picnic Table

 
Leave a comment

Posted by on August 19, 2016 in 3ds Max, Game Dev


Tags: , , ,